It's that time of year again! In this tutorial, we're going to build on the concepts from our guide on Extending VDMX6 Plus with Vuo to create some custom Halloween visuals. We'll be using Vuo to create 3D generative compositions that you can control and mix live in VDMX.
To get you started, this tutorial is accompanied by a new Halloween media pack, including 15 pre-rendered video clips (H.264, HAP, and HAP R formats) and the Vuo compositions used to create them. You'll be able to follow along, see how they're built, and use them as a starting point for your own spooky creations.
Download Links
Clip Exports (H.264) (Small)
Clip Exports (HAP) (Larger)
Clip Exports (HAP R) (Largest)
Getting Started: Vuo and 3D Models
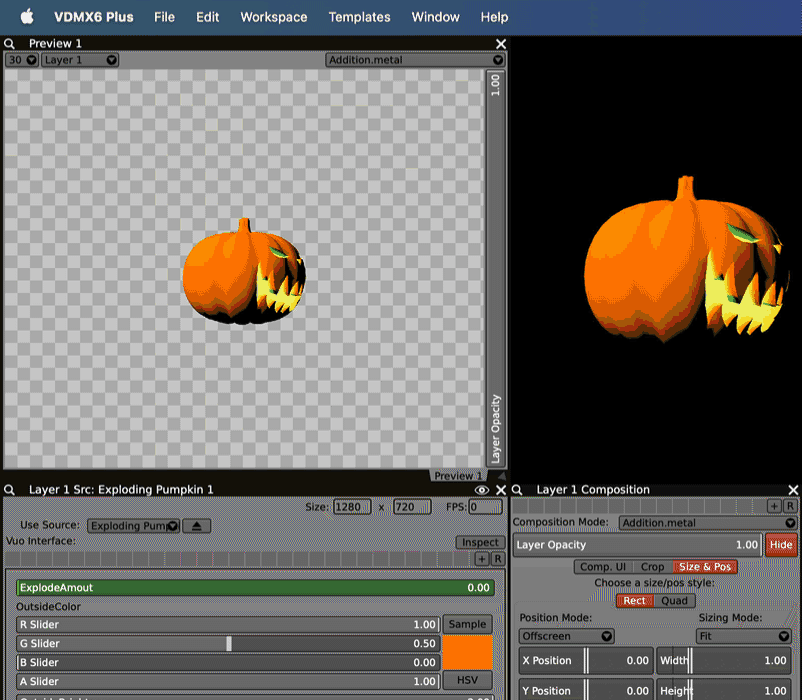
Vuo is an incredibly powerful node-based editor for creating interactive compositions. For this tutorial, we're focusing on one of its best features: the ability to easily load and manipulate 3D models. Our example compositions will load .obj or .fbx files of things like skulls, pumpkins, and ghosts.
Inside Vuo, we use nodes like Fetch Scene to load a 3D model, Render Scene to Image to turn our 3D world into a 2D video stream, and a variety of 3D transform nodes to make them move, rotate, and pulse. The real magic happens when we "publish" a node's input ports. These published ports become parameters that VDMX can instantly see and control.
In our examples, we've published parameters for:
Rotation: Control the X, Y, or Z rotation of the model.
Pulse: A simple BPM-synced pulse to make the object throb menacingly.
Color: Change the tint or texture of the 3D model.
Model Select: (In some compositions) A menu to switch between different 3D models.
A huge advantage here is that you can use the free version of the Vuo editor to open our example compositions, swap in your own 3D object files, and customize them for your own use in VDMX. Please note that if you want to render your compositions to movie files from within Vuo (like we did for the clip packs), you will need the Pro version of Vuo.
Loading Vuo Compositions in VDMX
Just like in the original tutorial, there are two easy ways to get your Vuo compositions into VDMX.
Drag and Drop: The simplest way is to find your saved
.vuocomposition file in Finder and drag it directly onto a media bin in your VDMX project. It will load just like a video clip or an ISF generator.Assets Folder: For a more permanent setup, you can install the compositions. In VDMX, go to the Help menu and select “Open Assets Folder in Finder.” Place your Vuo generators in the
vdmxGeneratorsfolder. After restarting VDMX, you'll find them in your "Sources" browser tab.
Once loaded, select the Vuo composition as your active source. You'll see all the parameters we published in Vuo appear as sliders and pop-up buttons in your layer's "Use Vuo Comp" panel. Now you can use LFOs, audio analysis, or MIDI controllers in VDMX to control your 3D scene in real-time!
Bonus Tutorial: Creating Ghostly Projections
A great-looking visual is only half the battle; presentation is key. One of the most effective Halloween projection techniques is creating a "Pepper's Ghost" effect using inexpensive screen material. This technique, used by creators like ProjectileObjects, can make your visuals appear to float in mid-air.
Here’s how to do it.
What You'll Need:
A Projector: Any projector will do, but brighter is better.
Screen Material: Inexpensive tulle (sometimes called "scrim" or "bridal mesh") from a fabric store. White or light grey works best for rear projection.
A Frame: You need to stretch the material tight. A great way to do this is with:
1/2" or 3/4" EMT conduit (from a hardware store).
MakerPipe connectors to build a custom-sized frame.
Circo EZ Light Grip ABS Snap Clamps to stretch and secure the tulle to the frame.
The Technique (Rear Projection):
Build Your Frame: Use the EMT conduit and MakerPipe connectors to build a rectangular frame that fits your window, doorway, or stage.
Stretch the Tulle: Place the tulle over the frame and use the Snap Clamps to pull it tight and secure it. You want the material to be as taut and flat as possible, like a drum. Wrinkles will catch the light and ruin the illusion. (You can also use a Frost shower curtain as a rear projection screen or alternative for the tulle. This will provide a better quality image, but will not be transparent).
Position the Projector: Place the projector behind the screen. The key here is projector placement. You must position the projector either low to the ground (aiming up) or high up (aiming down) at the screen.
Avoid the "Hot Spot": If you place the projector directly behind the screen at eye level, viewers on the other side will see the bright projector lens. This ruins the effect and, more importantly, can point a very bright light directly into someone's eyes. By placing it at an extreme angle, the projector itself is hidden from the audience's view.
Project Your Content: Aim your Vuo creations or the pre-rendered video pack at the tulle. The material is so fine that it will catch the light, making the image appear to float, while the audience can still see through the material, completing the ghostly illusion.

Snap clamps, MakerPipe, and EMT Conduit. Photo: ProjectileObjects
Notes on this Technique:
Front Projection: As ProjectileObjects notes, this also works with black tulle and front projection, but you will need a projector with a lot of lumens (brightness) to get a visible image, and colors may have difficulty displaying on the dark surface.
Safety: A major added benefit is that most tulle is IFR (Inherently Flame Retardant). This is crucial if you are setting up the projection near your house or if you are using it on a stage, where flame-retardant materials are required.
In Practice: ProjectileObjects has used this exact technique for ghostly projections on stage for Bent shows at the 9:30 Club in D.C. and with the group slowdanger for their performance of StoryBallet.

slowdanger x ProjectileObjects @ Texas A&M University, 2024
Scale it up (if you want!)

Resources & Inspiration
Looking for more content? Don't forget to check out our previous sample packs and the wider Halloween projection community.
Previous VIDVOX Sample Packs:
Colin Evoy Sebestyen Halloween Pack: https://docs.vidvox.net/vdmx/vdmx_sample_media.html#colin-evoy-sebestyen-halloween
Pixel Spirit Deck ISF Generators: https://docs.vidvox.net/vdmx/vdmx_sample_media.html#patricio-gonzalez-vivo-colin-evoy-sebestyen-pixel-spirit-deck-isf
Community Creators: The Halloween projection community is vast. This classic Reddit post has a great list of creators. We've used content from HalloWindow in our examples, and you can also check out these other pioneers:
Hallowindow: http://hallowindow.com/
Spectral Illusions: http://www.spectralillusions.com/
Window Creeps: http://www.themightymicroscope.com/windowcreeps/
Hi-Rez Designs: http://www.hi-rezdesigns.com/
And many more listed in the link!
We can't wait to see what you create. Have a spooky and creative Halloween!

slowdanger x ProjectileObjects 2025