A question that comes up for modern live visualists is how to best work with footage that doesn’t match the aspect ratio that is being used for the final display. Two particularly common situations are when you may be working with older format video that is 4:3 and in other cases it could be camera phone footage captured in vertical mode. In some cases it is okay to use the basic “fill” option within the composition mode settings so that the imagery is scaled to fill the entire output area when needed, but another useful technique is the “LiveLeak” style effect where a blurry version of the image appears blown up in the background.
Read MoreThe OSCQuery Protocol is a new specification that allows live performance tools to automatically communicate its parameters for rapid setup and improvisation between performers. Along with native support within VDMX here at VIDVOX we have developed several useful utilities that make it possible for people to take advantage of these new capabilities with software that support MIDI and OSC.
In this introduction tutorial we’ll be looking at how to use the free (and open source!) MIDI OSCQuery Helper utility to publish parameters from an Ableton Live project so that they can be accessed as browsable OSC parameters from other software such as VDMX. The MIDI OSCQuery Helper also includes its own built in Interactive Web Interface which can be loaded in web browsers on desktops, laptops, smart phones and tablets to remotely control any published controls.
Read MoreThe NDI® protocol from NewTek is a way to publish and receive audio / video streams over a network as a way to share live feeds between systems. From within VDMX, any number of video streams can be both output to the network and input from other applications.
In this tutorial we'll looking at capturing NDI® video streams that are published from other applications on the network and use them as the source for a layer. More information can be found in the VDMX manual in the section on video inputs.
Read MoreThe OSCQuery Protocol is an extension to the OSC specification designed to make setup of communication between applications easier. Within VDMX this new protocol can be used in severals ways that we'll be covering in this tutorial. You can also read more about OSCQuery in the blog post announcing its official release.
Read MoreThe NDI® protocol from NewTek is a way to publish and receive audio / video streams over a network as a way to share live feeds between systems. From within VDMX, any number of video streams can be both output to the network and input from other applications.
In this tutorial we'll looking at taking layers in VDMX and publishing them for other NDI® enabled software to access. More information can be found in the VDMX documentation in the NDI® Output plugin section.
Tip: For a quick demonstration try the "NDI® Output Example" option from the Templates menu in VDMX.
Read MoreAlong with the basic controls of inverting values and applying basic math equations, number FX chains can used to adjust the values of data-sources before they are applied to sliders. In this example the 'Fall' FX will be applied to an audio analysis level to create a falling style before being applied to a VU meter generator.
Read MoreOne our favorite questions for people who have been using VDMX is to ask them how they would show it to someone who has never used it before and we are especially excited to see how teachers are introducing the software in classrooms and workshops. Everyone learns best in a different way and it is always helpful for us to see new approaches to VJ techniques.
For this guest video tutorial we are joined by Kalma who has been organizing workshops in Europe on topics including VJing and 3D Mapping, covering a wide variety of software including VDMX.
Read MoreOne of the common problems that visuals artists working with software for real-time video is how to connect the output of one application into another. In the best case scenario every application you use would support Syphon for sharing video streams, but since that isn't the case there are a few other useful techniques that can be used in VDMX.
In this tutorial we will be looking at using the Display capture feature that makes it possible to use the entire contents of any screen as a video feed.
Read MoreOne of the common questions for VJs working alongside musicians is what is the best way to keep the tempo of all of the software being used by the different performers perfectly in sync. Ableton Link is a new technology developed by Ableton that answers this by synchronizing musical beat, tempo, and phase across multiple applications running on multiple devices, including VDMX.
Read MoreNow that iPhones, iPads and iPod Touch devices are readily available as extra mini-computers in our everyday lives, VJs and other video artists can take advantage of this by using them as additional live camera inputs in VDMX.
Read MoreThe Data Looper plugin in VDMX lets you create tracks that record data (values) from a data source, and then loop that data back, publishing it to the track's data source. Recording and playback is always quantized to the chosen clock, and the plugin also has a built-in editor that allows for quick and extensive modification of the recorded data, including scaling, warping, translation, and deletion.
In this tutorial we'll be looking at how to use the Data Looper to record incoming MIDI data and loop it quantized to the VDMX clock.
Read MoreOne of the common types of image filters that are found in the workflow for photo and video editing are LUTs, also know as "Look Up Table" based FX. LUT FX are used to change the color palette of an image to create a different stylized look or feel, or in some cases to mimic the look of different print film types.
In this video tutorial we'll be looking at how to use each of the three different ways to use LUT FX in VDMX and how to add your own ".cube" LUT files.
Read MoreProjectMilkSyphon is a free standalone app for the Mac that can be used alongside any Mac VJ application that support Syphon inputs. In this video tutorial we'll begin by looking at the options available within ProjectMilkSyphon and demonstrating how to receive the video feed in VDMX.
Read MoreWhile many VJs and musicians use equipment designed to look like a traditional instruments for running their visuals, another great way to have gestural control during a live performance is by using setups normally used for gaming.
In this tutorial we'll look at three different types of game controllers that you can use with VDMX.
Read MoreLike most interface items in VDMX, the Color Pickers can send their current state the DMX protocols for syncing with lighting consoles and fixtures making it possible for a VJ to control both the visuals and lights at a live event. In this video tutorial we'll set up a DMX controllable lighting fixture and set up a Control Surface plugin with interface items for adjusting each of the available parameters.
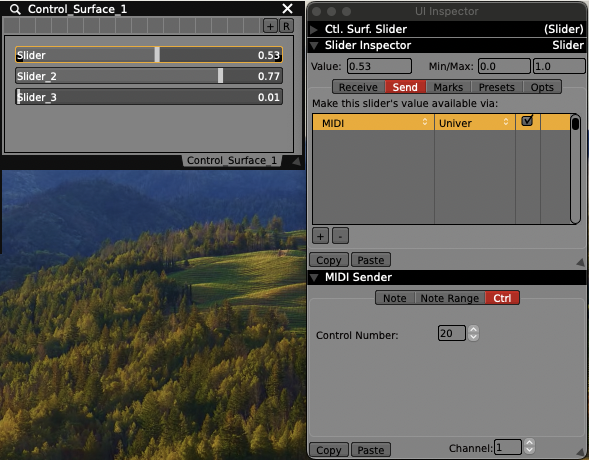
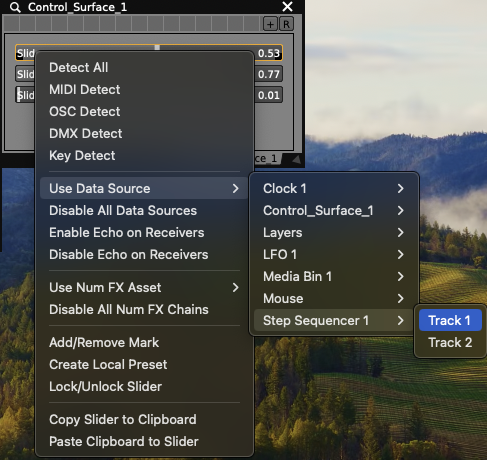
Read MoreWhile the Hardware Learn Mode and detect methods are often the fastest way for a VJ to connect sliders, buttons and other elements from a physical controller to their corresponding UI items in VDMX, sometimes it can always be useful to manually enter in these addresses. You may need to do this if some item on the controller sends multiple MIDI values at the same time, or when attempting to set up a project working from a spec sheet when the device isn't actually plugged in.
Read MoreOnce a video is playing, the next step in the process of visual performance is to apply real-time FX to each frame to change the way it looks before it is shown to the audience.
In some cases the FX being used are in a utility function, for example a Color Correction filter makes it possible to adjust the contrast, saturation, and brightness levels when calibrating projectors. Others are designed to stylize the image to match a particular aesthetic such as glitch or film.
Read More