Visualizing and adjusting color levels with the VDMX Scopes plugin

The Scopes plugin in VDMX6.1 provides a set of powerful real-time tools for visualizing the color data of your video streams. These scopes can be incredibly useful when used alongside color adjustment effects like Color Controls or LGG, helping you fine-tune brightness, hue, and balance for live visuals or studio work.

You can quickly explore the plugin using the “Scopes Demo” template found in the Templates menu, or follow along with the video tutorial to build your own customized setup from scratch.

Main Features of the Scopes Plugin

The Scopes plugin interface provides:

  • FPS Menu – Adjust the update rate for preview refreshes.

  • Video Source – Choose which video source to analyze (layers, cameras, or other video taps).

  • Display Mode – View all scopes at once or focus on a single visualization.


VDMX6 Scopes Plugin Vectorscope Waveform Point Scope

Visualization Types

The plugin includes three distinct scope modes for analyzing video:

  • Waveform Scope

    • Displays brightness and color distribution across the frame.

    • Can be switched between Waveform and Parade mode.


  • Point Scope

    • Draws color information as points with adjustable point size.

    • Can be toggled between YCbCr and HSV color spaces.


  • Vector Scope

    • Visualizes color hue and saturation as lines.

    • Supports both YCbCr and HSV display options.


Additional Controls in the Inspector

The Scopes plugin also offers fine-grain control through its Inspector panel:

  • Publish Scopes as Video Taps – Each scope visualization can be published as a separate video source, making it available to layers and video receivers throughout your VDMX project.

  • Graticules – Optionally overlay reference lines on published taps.

  • Colorized or Black & White Modes – Choose how the scopes are displayed based on your workflow needs.

  • Enable Toggles – Individually turn scopes on or off to optimize system performance when needed.


Practical Applications

  • Fine-tune your color corrections live by monitoring scopes while adjusting Color Controls FX or LGG settings.

  • Send scopes out to an external display for technical monitoring or visual aesthetics.

  • Create creative feedback loops by compositing scopes into your main output.


Try It Yourself

Explore the Scopes Demo template included in VDMX6.1, or create your own setup based on your project’s needs. Whether you’re perfecting a broadcast feed, building dynamic art installations, or tuning visuals for live performance, the Scopes plugin offers a whole new level of control and creative possibility.

Download the ISF Video Pattern Test Generator here.

More Information:

Download the latest version of VDMX and start experimenting today at vidvox.net.

If you create something cool using the Scopes plugin, be sure to tag us [@VIDVOX]—we’d love to see what you’re building.

Tracking faces, bodies, and hands with VDMX

The Video Tracking plugin provides an interface for detecting faces, bodies, and hands and using their locations as data-source values and masks that can be used to control virtually any part of VDMX.

In this tutorial we will look at using the face and hand tracking options in the Video Tracking to create a fun example of controlling the parameters of a simple ISF generator.

Download ISF Shader and Project Files here.


The main panel for the Video Tracking plugin contains a pop-up menu for selecting which video feed to analyze and a status indicator for the analysis.

For situations where multiple bodies and / or faces are detected, the provided 'prev', 'next', and 'rand' buttons can be used to switch between which is currently being tracked. When previewing the body and face tracking video streams clicking on a bounding box region can also be to change the active tracking.

The tracking options are as follows:

  • Human Tracking: Detects human bodies and publishes the position as data-sources. This includes the center position, width, height, and the x/y coordinates of each corner of the box bounding detected people. A boolean 'Detected' data-source turns on / off when bodies are found.

  • Face Tracking: Detects faces and publishes the position as data-sources. This includes the center position, width, height, and the x/y coordinates of each corner of the box bounding detected face. A boolean 'Detected' data-source turns on / off when faces are found.

  • Hand Detect: Detects one or more hands and publishes the center position as data-sources. Includes options for specifying the maximum number of tracked hands and the chirality type (All, Left, Right, or Pairs). A boolean 'Detected' data-source turns on / off when hands are found.

  • Human Mask: Generates a mask image that can be used e.g. with the Layer Mask effect to remove the background from images. Includes a quality setting (accurate, balanced, or fast). Also see the 'Remove Background' effect.

  • Attention Saliency: Generates a mask image using an Attention Saliency algorithm.

  • Object Saliency: Generates a mask image using an Object Saliency algorithm.

Where available the 'Publish Preview' option can be enabled for each tracking mode. This will create a video feed with overlays showing bounding boxes and other visualizations related to the analyzed images.

The "Minimum Latency" option in the inspector can be enabled to reduce latency (masks will be tighter) but takes longer to process (framerate may be lower, depending on the overall system load). This is option is off by default.

Hand tracking in VDMX6

If you have a LeapMotion or UltraLeap, and want to try the GECO application to share OSC data with VDMX. You can find it here: https://uwyn.com/geco/ We used the first generation LeapMotion controller in this tutorial.

For the iPad you can use Shoots Pro for sharing over NDI or Elgato Epoccam

Introduction to OCR & QR code capture in VDMX

VDMX 6.1 introduces a powerful new OCR (Optical Character Recognition) plugin that allows you to scan text and QR codes from live video input. These scanned results can be published as data-sources and used to trigger UI elements, update text layers, or automate actions in your VDMX setup.

Getting Started

To try it out, load the OCR Example template from the Templates menu. This preset is included with the latest version of VDMX and demonstrates how to use both OCR and QR scanning.

Before using the OCR plugin, make sure:

• You’re running VDMX version 6.1 or later

Quartz Composer is enabled under VDMX > Preferences > Rendering

What You Can Do

Live Text Scanning: Point your webcam at printed or handwritten text and see it appear in real time.

QR Code Scanning: Detect and display QR content directly into your project.

Data Routing: Use the UI Inspector to map scanned strings to text layers, pop-up menus, or other elements.

Clock Syncing: Trigger OCR or QR scans automatically on every beat using the Clock plugin.

This makes it easy to create interactive visuals using real-world inputs—great for installations, performances, or creative automation.


Trigger Media Clips in Real Time Using OCR and QR Codes in VDMX

By why stop there!? These outputs can be used to control UI elements like pop-up menus and, in turn, trigger clips in the Media Bin.

In this other tutorial, we’ll walk through how to set up a system that lets you hold up color-coded QR labels or text to control clip playback — ideal for powering interactive installations, printed cue cards, or playful VJ sets.

Getting Started

1. Open the “OCR Example” template from the Templates menu.

2. In the Workspace Inspector (Cmd+1), add a Control Surface plugin.

3. Create a Pop-Up Button and label its items (e.g., Red, Green, Blue).

4. In the UI Inspector (Cmd+2), set the pop-up to be controlled by the OCR text string:

• Navigation > Select by string

• Data-Source > OCR Text

Link OCR to Media Playback

Once your pop-up button is receiving the OCR string:

1. Go to the Media Bin Controls tab.

2. Set Trigger by Index and choose the pop-up button as the source.

3. When the pop-up changes value (based on OCR input), the corresponding clip will be triggered.

Try It Live

Switch the OCR video source to a FaceTime or external camera, then hold up QR codes or printed text. As the plugin reads values like “red,” “green,” or “blue,” it updates the pop-up and triggers the matching clip.

You can also sync scanning with the Clock plugin to automatically scan at regular intervals, creating hands-free interaction loops.

Tips & Tricks

Case matters – OCR text strings must match your pop-up labels exactly.

• You can also scan handwritten words, printed stickers, or even project QR codes from your VDMX interface using:

QR Code Generator Source (creates QR codes as layer sources)

QR Code Overlay FX (renders QR code overlays on top of any layer)


Try It Yourself

The OCR Example template is available in the latest build of VDMX. If you’re experimenting with it in your work, tag us—we’d love to see how you’re using this feature.

If you’re building an interactive installation or performance using OCR, we’d love to see it. Tag us or share your project with [@VIDVOX].

Using VDMX as a Step Sequencer and LFO for Euroracks

One of the most fun aspect of using Eurorack setups is the ability to quickly reroute control data and sound between different modules. Conversely one of the most limiting parts of using Eurorack setups is the ability to quickly swap out different modules from your rack to get different kinds of control data and sound coming and going from your system. In this tutorial we will look at how the Step Sequencer and LFO plugins in VDMX can be used alongside Eurorack setups to provide a versatile approach to generating CV values.

As Eurorack modules are also often a significant investment of money, it can also sometimes be useful to use software tools like VDMX to simulate their abilities to determine if they are a good fit for your needs before purchasing.

Overivew

This tutorial is broken into three main parts:

  1. Setting up our Eurorack to convert MIDI to CV.

  2. Setting up VDMX to send MIDI to the Eurorack.

  3. Configuring step sequencer and LFOs in VDMX to control parameters on our Eurorack.


Setting Up A Eurorack To Receive MIDI to CV

Univer Iter MIDI to CV and Tiptop Audio Buchla 258t Eurorack modules.

For this initial demonstration of doing MIDI to CV we are using the Noise Engineering Univer Inter along with a Buchla & Tiptop Audio 258t Dual Oscillator module to generate tones.

The Univer Iter has 8 CV out ports along with a USB port which can be directly connected to a computer for receiving incoming MIDI. Within applications like AudioMIDI Setup and VDMX it appears as a standard MIDI output device option. It also can be configured to use a custom MIDI mapping as needed and can be daisy chained with a second module for another 8x outputs.

A variety of different modules are available for taking MIDI data in one form or another and converting it to CV. As always with Eurorack setups it is prudent to spend some time looking at all of the module options and picking the best for your specific needs.


Setting Up VDMX To Send MIDI Output

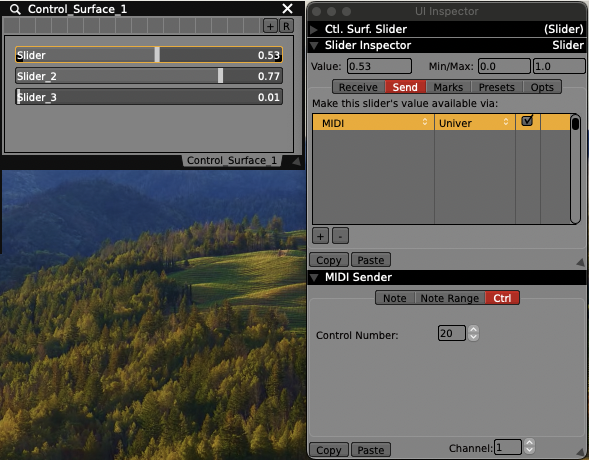
Most user interface controls in VDMX such as sliders and buttons can be configured to directly send their current value as MIDI output using the “Send” tab of the “UI Inspector” window. When configuring VDMX to drive external devices such as a Eurorack it is often useful to add a “Control Surface” plugin with customized set of UI elements that represent each of our individual CV outputs.

Steps:

  1. Use the “Plugins” tab of the “Workspace Inspector” to add a “Control Surface“ plugin to the project.

  2. Use the sub-inspector to add one or more UI elements (sliders, buttons, pop-up menus, etc). to the control surface interface.

  3. Click on each UI element in the Control Surface main window to inspect it. Use the “Send“ tab of the “UI Inspector” to configure the MIDI mapping and output device.


Configuring Step Sequencer and LFOs in VDMX To Control Eurorack Parameters

Now that our Eurorack is receiving MIDI from VDMX and converting it to CV we can begin to set up our Step Sequencer and LFO plugins to drive individual parameters of our synthesizer.

A VDMX setup with a two track step sequencer, an LFO, a clock plugin, and a control surface configured to send MIDI output.

Steps:

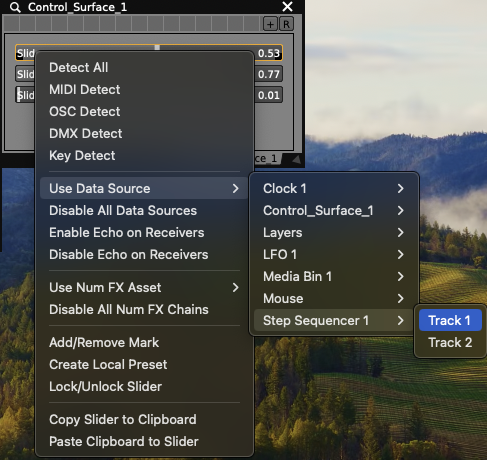
Right-click on sliders and buttons to assign data sources.

  1. Use the “Plugins” tab of the “Workspace Inspector” to add a “Step Sequencer“ plugin and an “LFO” plugin to the project.

  2. Use the sub-inspector to customize Step Sequencer / LFO configurations as needed.

  3. Right click on output UI elements in the Control Surface or use the UI Inspector to route generated control data to our MIDI outputs.

  4. Patch the MIDI module CV output to synthesizer input parameters.

  5. Use the “Clock” plugin to adjust the overall BPM.

Once we’ve created our parameter routings on the Eurorack we can also optionally further customize our Control Surface with appropriate labels and display ranges, or continue to leave them as generic 0-1 values that are commonly re-patched on the fly.


How to control an Ableton Live project from a web browser (and other software) in about a minute

The OSCQuery Protocol is a new specification that allows live performance tools to automatically communicate its parameters for rapid setup and improvisation between performers. Along with native support within VDMX here at VIDVOX we have developed several useful utilities that make it possible for people to take advantage of these new capabilities with software that support MIDI and OSC.

In this introduction tutorial we’ll be looking at how to use the free (and open source!) MIDI OSCQuery Helper utility to publish parameters from an Ableton Live project so that they can be accessed as browsable OSC parameters from other software such as VDMX. The MIDI OSCQuery Helper also includes its own built in Interactive Web Interface which can be loaded in web browsers on desktops, laptops, smart phones and tablets to remotely control any published controls.

Read More

Sending NDI® Audio/Video streams from VDMX

The NDI® protocol from NewTek is a way to publish and receive audio / video streams over a network as a way to share live feeds between systems. From within VDMX, any number of video streams can be both output to the network and input from other applications.

In this tutorial we'll looking at taking layers in VDMX and publishing them for other NDI® enabled software to access. More information can be found in the VDMX documentation in the NDI® Output plugin section.

Tip: For a quick demonstration try the "NDI® Output Example" option from the Templates menu in VDMX.

Read More

The OSCQuery Client Plugin

The OSCQuery protocol makes it easy for software that supports OSC to access each others parameters for remote control, without a lengthy setup process. Within VDMX there are a few ways to take advantage of this and in this tutorial we will focus on using the OSCQuery Client plugin which can be used to browse the address space of a server and add UI controls that are automatically configured to send to it.

Read More

Using OSCQuery In The Control Surface Plugin

The Control Surface is one of the most widely versatile plugins in VDMX, making it possible to create sets of custom interface elements that can be used to control nearly any aspect of your workspace or send MIDI / OSC / DMX to other systems. The Control Surface plugin also has the ability to publish its list of parameters over a local area network using the OSCQuery protocol so that other software can remotely browse and control almost any aspect of your VDMX project.

In this video tutorial we'll be looking at the basics of using OSCQuery protocol from within the Control Surface, and three ways that those parameters can be accessed from software running on other devices: using our free OSCQuery Browser utility, another copy of VDMX and a web browser running on an iPhone.

Read More

Creating a 'Falling' audio level data-source using number FX chains in VDMX

Along with the basic controls of inverting values and applying basic math equations, number FX chains can used to adjust the values of data-sources before they are applied to sliders. In this example the 'Fall' FX will be applied to an audio analysis level to create a falling style before being applied to a VU meter generator.

Read More

Mixing, Adjusting and Generating Complementary Color Data-Sources in VDMX

While Quartz Composer is mainly used for creating interactive video sources and FX, one of of the other powerful ways it can be used in VDMX is to create your own custom plugins that can generate values or manipulate data-sources that can be used to drive other parameters in your setup. Another great thing about this feature is that once these compositions are created they can be shared and easily installed on different computers so that other people can take advantage of the new functionality.

For this tutorial we'll be looking at three very simple Quartz Composer compositions can be used within VDMX for manipulating color data-sources in particular.

Read More

Using Ableton Link in VDMX

One of the common questions for VJs working alongside musicians is what is the best way to keep the tempo of all of the software being used by the different performers perfectly in sync. Ableton Link is a new technology developed by Ableton that answers this by synchronizing musical beat, tempo, and phase across multiple applications running on multiple devices, including VDMX.

Read More

Introduction to The Timecode Plugin

When designing preplanned shows and working alongside other software, one of the common tasks is keeping the timing of everything in sync. Within VDMX there are two main ways of working with time – the Clock plugin which is used for working in measures and beats and the Timecode plugin which counts in SMPTE time.

In this set of tutorials we'll cover the basics of using the Timecode plugin which publishes several data sources in VDMX, and is capable of both receiving and sending SMPTE timecode in a variety of formats.

Read More

Gesture Recording With the Data Looper

The Data Looper plugin in VDMX lets you create tracks that record data (values) from a data source, and then loop that data back, publishing it to the track's data source. Recording and playback is always quantized to the chosen clock, and the plugin also has a built-in editor that allows for quick and extensive modification of the recorded data, including scaling, warping, translation, and deletion.

In this tutorial we'll be looking at how to use the Data Looper to record incoming MIDI data and loop it quantized to the VDMX clock. 

Read More

Using VDMX as a Syphon Mixer

One of the best things about being a VJ on the Mac these days is Syphon which makes it possible for all of the different tools that are available to work together in countless ways. Within VDMX it is possible to have as many Syphon inputs and outputs as your computer can handle, which allows for it to be used as a source, mixer, FX processor or final output for other software you may want to work with.

In this video tutorial we'll look at a simple use case for connecting several Syphon enabled applications to and from VDMX by creating a two channel mixer that fades between two Syphon sources and publishes back out for other applications to use.

Read More

Analyzing multi-track audio from Live in VDMX using Soundflower

For musicians working in Ableton Live or other multitrack production software one of the most useful tricks for driving real-time visuals is to output each sound track on a different set of audio channels before they are mixed together to get more accurate results for each sound when performing audio analysis in VDMX.

Read More