VDMX and QLab? Hmm…

QLab and VDMX, but why? Some of you who read this post may already be VDMX users, or QLab, neither, or both, but let me start by saying they work great together. Complimentary even!?

To start, both are Mac specific and work great together locally or over a network. This includes features such as Timecode, DMX, OSC, MIDI, Video over Syphon or NDI, Lights, Sound & more.
Over the years, QLab has become a standard in theaters and performance spaces of all sizes. It works as a cue based system (think, video plays, the actor moves into their next location, hit space bar, and the next series of cues triggers). In QLab, you build a show and step through it, cue after cue.
Some of you VDMX users may say, “Hey, but VDMX has a cue based plugin, I can just use that.” You’re right!, but when you walk into a performance space with union audio, lighting, and video pros, and they ask for your QLab file, you can’t simply say, “learn VDMX.” And frankly, they don’t have to.
For all you QLab lovers out there, VDMX is a modular based live performance software (yes, with a cue based system, and so much more!). VDMX offers a customizable solution to enhance your QLab experience and go beyond what the application has to offer.
Let’s say you want to trigger live elements during your show without compromising your QLab show file or in-house setup. With Syphon and OSC you can automate various functions in QLab. Sync or Trigger Cues based on Live Audio, add custom effects, blend modes, or load ISF shaders and Vuo compositions. VDMX has tons of build-in FX and plugins. You can live mix camera feeds, iOS device screens, Web-browsers, and more. And you can trigger them withe the push of a button; any button!
For all you VDMX users interested in QLab; you can make use of QLab’s built-in projection mapping features, advanced audio output options (7.1 Surround sound?), DMX lighting patch and fixture definitions, and ultimately, integrate your setup to work well with other professional theaters and performances spaces.
If you want to know more about VDMX, download the demo and give it a try. If you want to try QLab goto: https://qlab.app/ and download the full version. Make sure to set it to demo mode to test out the full functionality or rent a license for your next show.
Finally, if you have questions or thoughts, post in our forums: https://discourse.vidvox.net/
Who knows, maybe your question will help someone else discover their answer in the future. Check out the videos or step by step explanation below. Thanks and Enjoy!
Tutorial #2: QLab & VDMX - Blend Modes and Live Audio
Links from Video:
VDMX Sample media can be downloaded from here: https://docs.vidvox.net/vdmx_sample_media.html
ISF Shaders can be found online and downloaded from here: https://editor.isf.video/ including: Lightning Flash
QLab’s OSC Dictionary: https://qlab.app/docs/v4/scripting/osc-dictionary-v4/
Artist Emily Laychak’s illustrations and puppet show can be found here: https://www.instagram.com/_saw_the_wheel_/
Now go out there and create! Imagine using something like Colin Evoy Sebestyen’s “Stargate” https://vdmx.vidvox.net/tutorials/create-a-generative-stargate.

Overview

Make sure to set VDMX OSC Output Ports to 53000. You can find this in the top menu VDMX>Preferences>OSC>Output Ports

Create a ‘Control Surface’ add a slider and in the UI Inspector, set the slider to Send OSC data to /cue/1/opacity
Now you can right click on your slider and pair it to a midi controller. The OSC data will control cue 1 layer opacity within QLab.

Create an LFO. If you’ve already paired your midi controller, you can create a master preset for the control surface, or you can create a preset on the slider itself: (more about creating slider presets here).
With your preset created, Right click on the slider in the control surface. ‘Use Data Source'‘>LFO 1>Cosine.
Now the rate of the Cosine with automate the Opacity within QLab.

Part 2
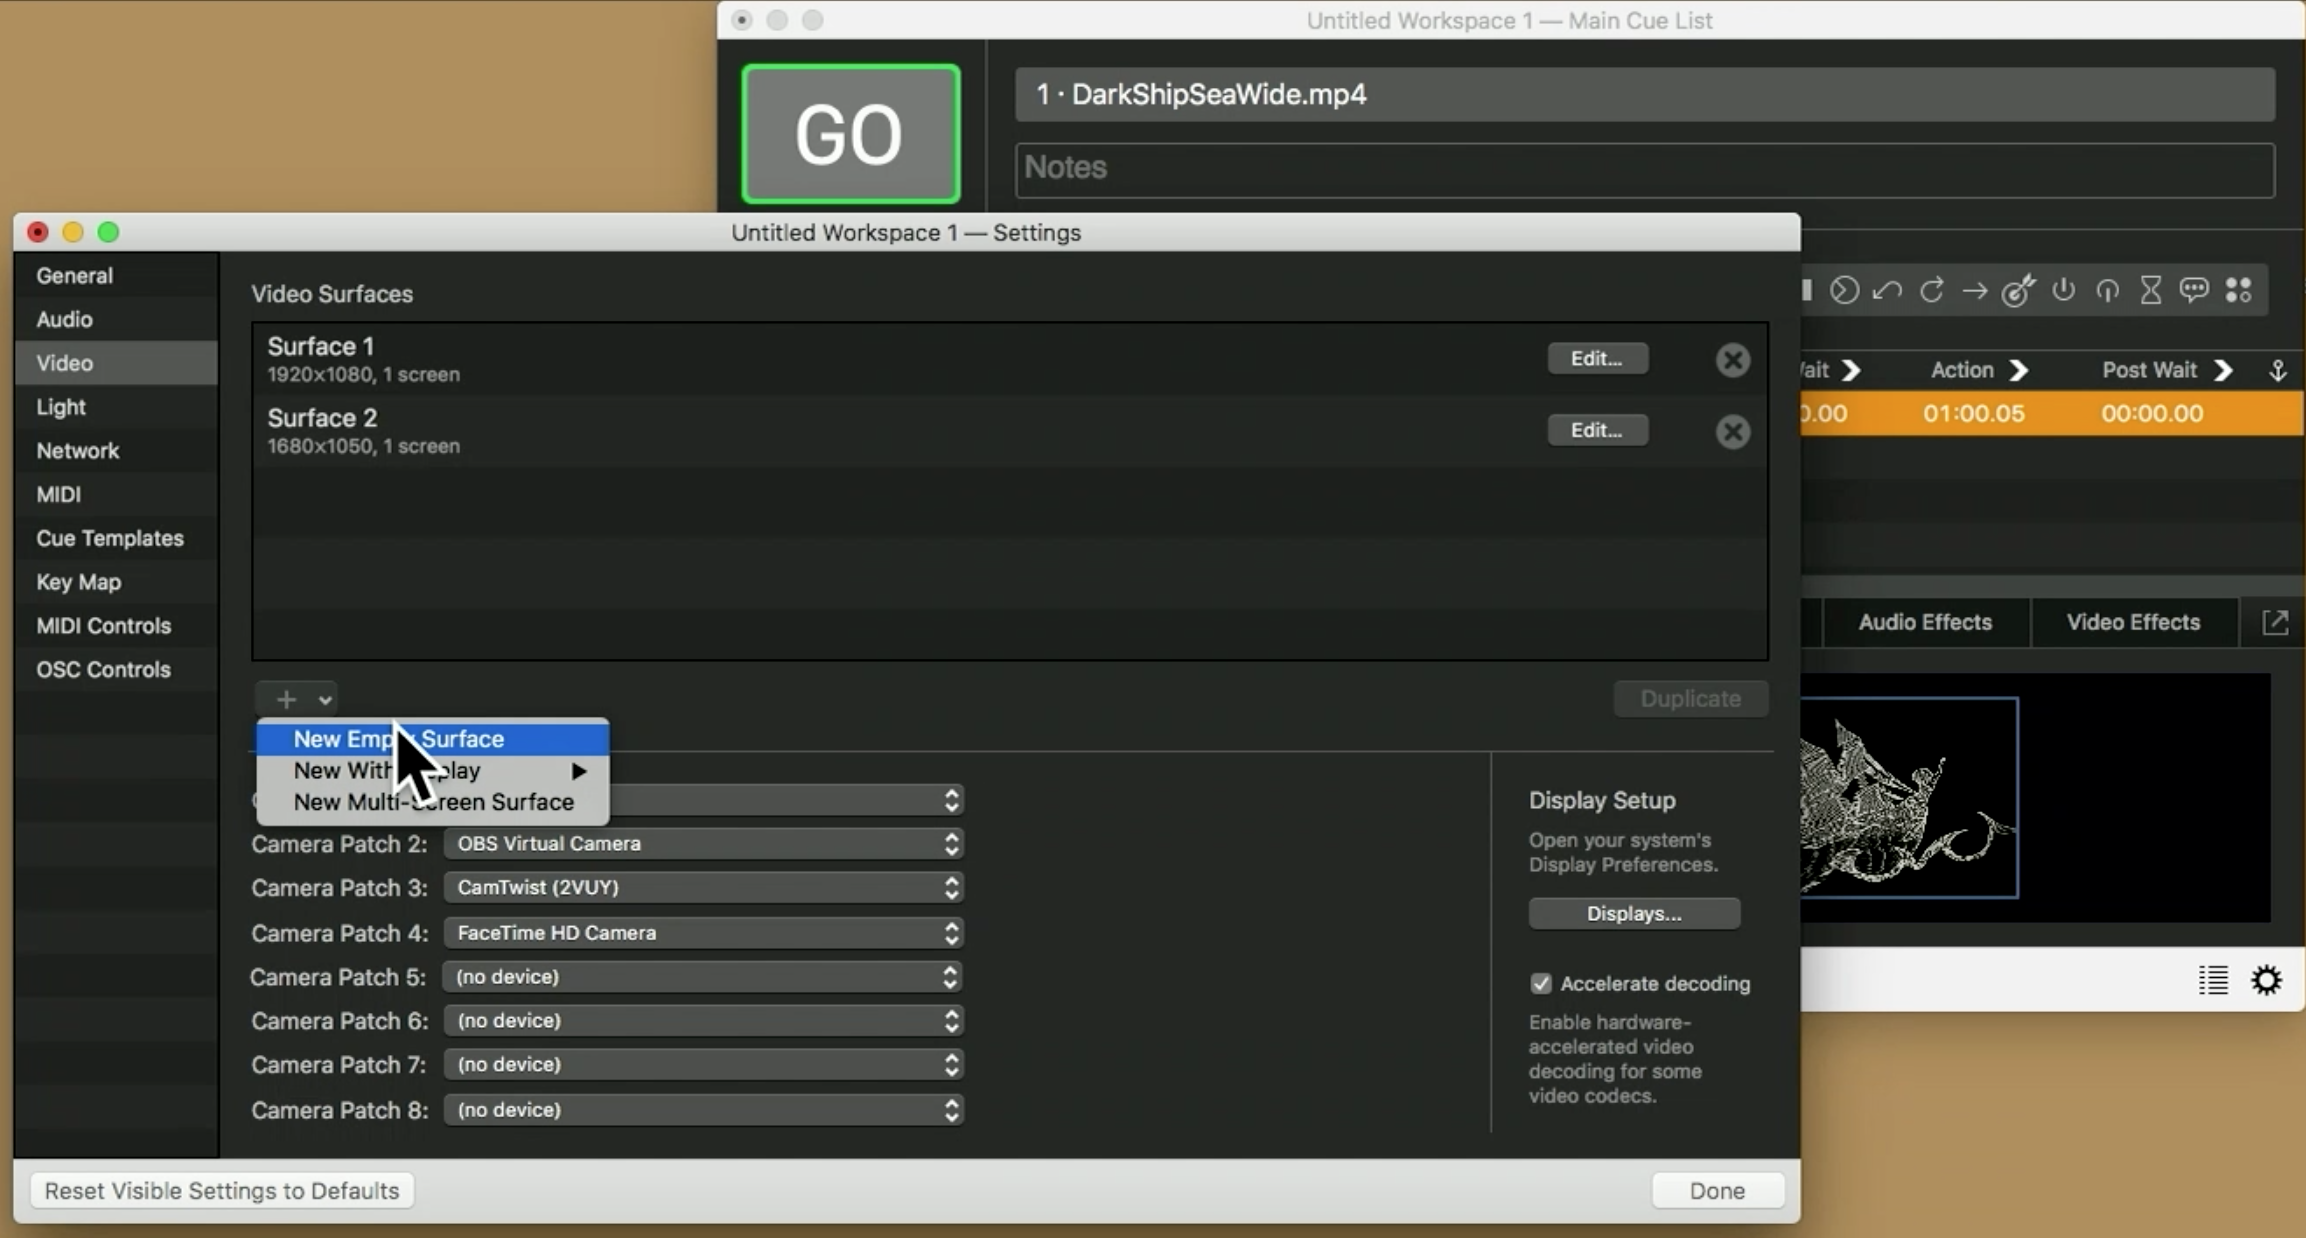
In QLab. Open settings Preferences > Video and create a new empty surface ‘+’.

Click ‘Edit’ on the new surface. Hit the ‘+’ and add a Syphon Screen. Make sure to change the output Dimensions to that of your project. For example 1920 x 1080.

Put a video in your project and under ‘Display & Geometry’ change the video surface output to your new Syphon Layer.

Open VDMX. From the top menu select Templates>Syphon Player

Change the Syphon Output from ‘VideoOut’ to ‘Main Output’

Back in QLab Video preferences, set Camera Patch 1 to the 'VDMX - Main Output’

Add a camera to QLab and select VDMX from the camera patch.
Now when you play both layers, the video Cue will send the video out to syphon/VDMX and the camera Cue will bring the output of VDMX back in to QLab.

In VDMX. Right-Click in the Media Bin and Add Clips From Built-In Sources> Syphon> QLab
This will add the QLab output to VDMX which can be triggered by selecting it.

Using the Workspace Inspector in VDMX. Under the Layers tab. We will hit the ‘+’ to add a new layer. With the layer selected you can rename it or popup the sub menus from the Workspace inspector. (If you haven’t already).
In the composition tab you can change the ‘Composition Mode’ of that layer as well as Size, Crop, and Positioning.
In this case I renamed Layer 1 to Lightning Flash.
Left Click and drag the Lightning Flash layer to be above the QLab Syphon layer.

Download a ISF Shader Lightning Flash. Drag and drop the .isf file into the media bin.
Select the Lightning Layer from the media bin to set the layer destination (Note: you can program Midi controllers, Keyboard shortcuts, etc, to twitch between these in the future).
With the correct layer destination set to Lightning, select the ISF shader to load it into our top layer.

Now, with QLab playing the video cue. Sending into Syphon/VDMX (ship video). We can now trigger a flash over top of the ship video by clicking ‘flash’ in the ISF shader.
We can pair the flash to a button or midi controller, or take it a step further and have it trigger with live audio.

VDMX> Workspace Inspect under the Plugins tab. Click ‘+’ and add an Audio Analysis plugin.

To set the flash to trigger from audio. Right click on the flash button > Use Data Source > Audio Analysis 1 > Filter 3.
You can adjust the gain slider on the left side of the Audio Analysis plugin (AA). You can change the frequency, range, etc. For more about the AA plugin see here: https://vdmx.vidvox.net/tutorials/audio-analysis-basics

Playing both Cues in QLab (Video, Syphon Camera In). We can see from our full screen preview that a sound such as a clamp can trigger the flash over the video. You can experiment much further with sound triggers, ranges, limits, and FX.
Try switching blend modes and experimenting to get a unique look for your next QLab & VDMX project.
Figure 53® and QLab® are registered trademarks of Figure 53, LLC. VIDVOX LLC. is not affiliated with Figure 53, LLC and this blog post and tutorial has not been reviewed nor is it approved by Figure 53, LLC