Along with the technical tutorials on how to use VDMX and other software tools, one of the main focuses of this site are topics related to the field of performing live visuals. In this post we'll be looking at some of the techniques that are used to bring a show from an idea through to an actual production, covering the areas of:
Read the Historical Sound and Vision Primer from Candystations for ideas on how to connect sounds and visuals.
- Mood boarding: A primer, or “mood board,” is used to gather ideas for the overall style and palette for the visual design. This may include a collection of colors, graphics, textures, image references, screen grabs and sketches.
- Storyboarding: A storyboard takes the elements derived from the mood board and places them in time, typically matching up events such as style changes with important moments in other elements of the show production, such as the music or theater scene changes.
- Pre-production: During pre-production any prepared material, such as video files, still images, interactive generators, custom FX, that are needed for the show are created and arranged in the performance software for rehearsals.
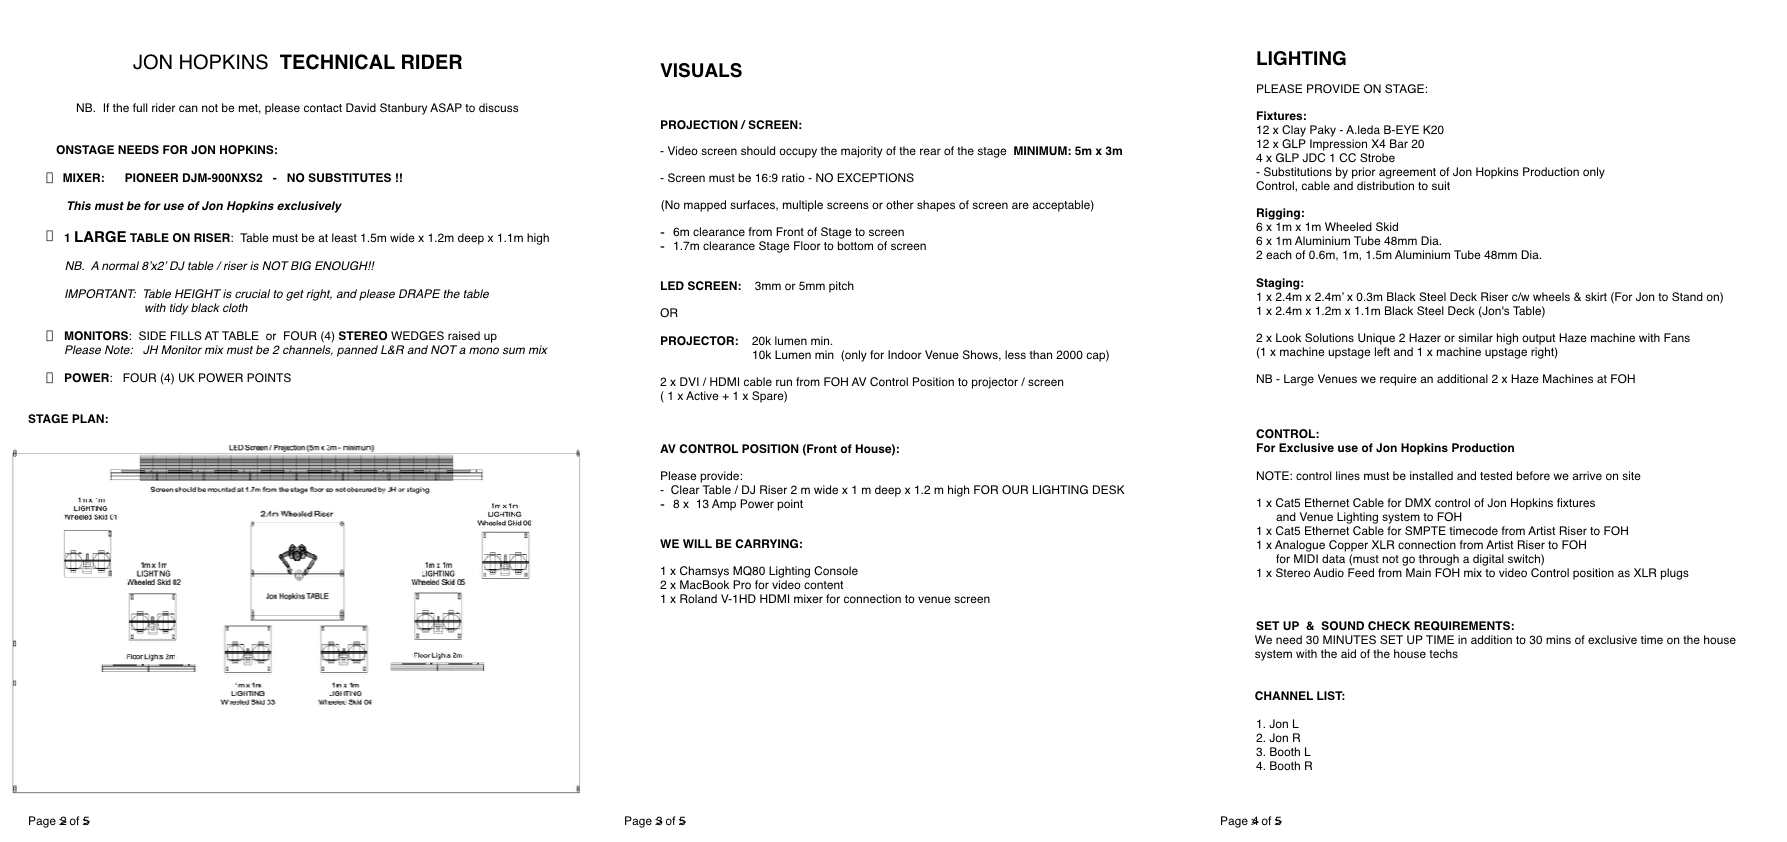
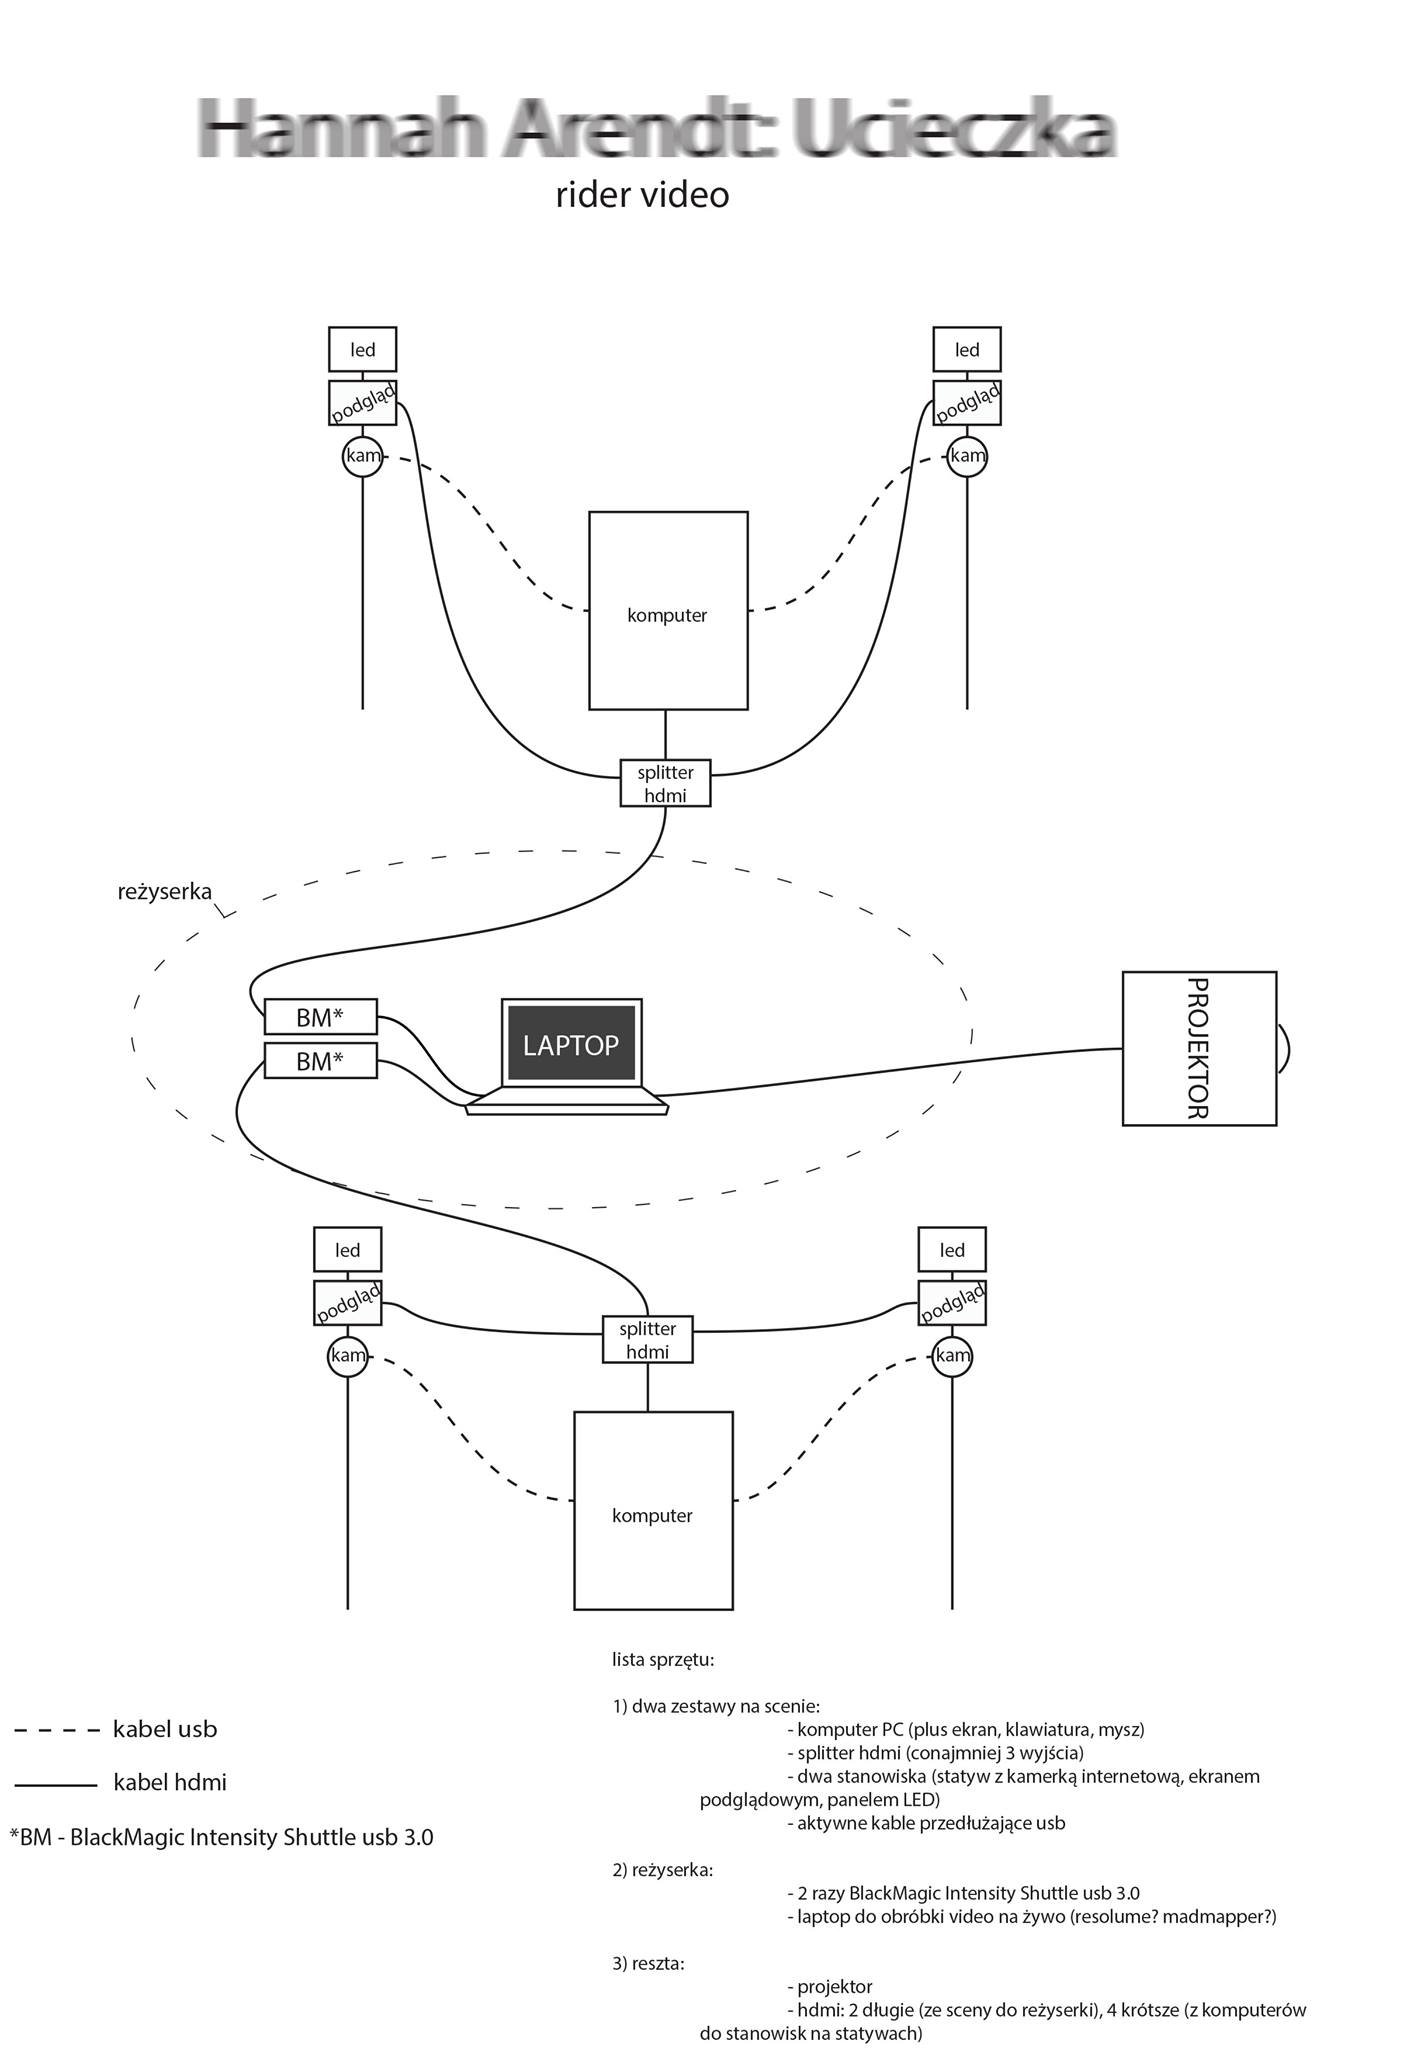
- Technical riders: Technical rider documents are often created as a way to clearly describe the broad technical aspects of a show production, including details like equipment lists, wiring diagrams, stage layouts, venue requirements, and contact information for people involved.
It is important to note that not every show will need all of these stages of production, and many shows will have other phases of development not covered here; these are simply four of the most common points along the path of creating an event from start to finish.
For this write up we are joined by Candystations and several other artists who have shared some of their own mood boards, technical riders and other planning documents for us to include here as examples.
Mood Boards
Bang On A Can early concept via Candystations
The starting point for a visual design typically starts with a mood board that helps capture the desired looks and feels that will be used in the project. This may include a collection of words, colors, graphics, textures, image references, screen grabs, sketches or other materials that contain some relevant details. There is no set process for creating one, for some people tools like Pinterest are useful, others will simple keep a folder full of files on their hard drive. Simple image collages can be created to explore juxtapositions between ideas.
If the visuals will correspond to music, actors, or other events, this is an opportunity to consider the relationships and conceptual mappings between these elements. The Historical Sound to Vision Primer from Candystations is a great "cheat sheet" of ideas that provides some common ways that sonic and visual elements can work together in a performance.
Once the materials have been gathered, they can be arranged and organized by concepts. Again this can happen simply by using Quicklook in the Finder and using folders, a rich text editor such as TextEdit, or by using a photo editing tool to create a PDF document with additional notes. The completed document can be useful when you are working alone, but can also be especially important when working with collaborators or clients to help express the creative direction that you want to explore, sometimes even before you've started to officially begin work on a project. It can also serve as starting points for the next stages that we'll discuss, creating storyboards and pre-preproduction.
Page from Planning for “Age Of Adz” via Candystations, a mood board that evolved into story boards with pre-planning notes.
Storyboards
After the theme, setting, and mood for a performance or a production are planned out in mood boards the next step is often to plan out, or “storyboard” a script for choreographing various forms to music, actors, or other timing elements of the show.
In the animation industry, storyboards are comprised of “extremes and in-betweens.” Extremes are moments that set the exact mood, emotion, or key image in a sequence. In-betweens are the transitional frames that move from one extreme to the next.
Basic animation loop story board.

In the world of film production a storyboard is also commonly known as a shooting board. Here we essentially have a series of frames, with drawings of the sequence of events in a film, like a comic book or photo novella version of the film. Preparing these documents can help film directors, cinematographers and clients visualize the scenes and how they connect together.
For a show production the same ideas from both animation and film storyboards can apply; you may have storyboards that show the broad changes in themes between and over the course of individual songs or act, and you may have storyboards that focus on the details of specific changes within a verse or scene.
Story board example from the “How to Turn an Old Building into an Interactive Driving Range by Gabe Shaughnessy & Dan Cohen” case study.
Pre-Production
At this point work can begin on the actual creation of any special resources that will be needed for the live performance itself; this can include rendered images, photographs, videos, film, writing code for any real-time generators or FX, and going through the process of arranging these materials in the show production software.
A pre-production planning guide based on the story board phase can be a useful way to coordinate work between several people. It is fairly common to find collaborators, assistants or other means to deal with time constraints and to fill in any gaps in your own knowledge.


“We worked with Aaron Rogosin to voice and animate the moon. After scripting out the moon’s lines, we filmed Aaron speaking them, then motion tracked the movements of his face as he talked. We mapped the video to a high-res photo of the moon we got from NASA. Then we split the lines into single clips we could trigger with a TouchOSC soundboard and exported them as HAP Alpha.”
If you are planning out a show in detail in advance, tools such as the Cue List plugin in VDMX or QLab to pre-program as much of the event coordination as possible. When using multiple pieces of software you can use timing protocols such as LTC or MTC, or control data protocols such as MIDI, OSC and DMX to synchronize events.
In the later of pre-production, you may begin to prepare the finalize materials for the show, doing things like exporting to different resolutions or aspect ratios to accommodate, and converting media files into HAP for optimized playback on the show playback systems.
Technical Riders
Regardless of the complexity of the production, a technical rider can be a useful document to prepare, even if it is just for yourself. Traditionally the rider contains all of the information that a venue and other agencies involved with the production will need in advance of the show to meet your needs. A rider will often contain information such as gear requirements, stage layout and cable wiring diagrams, along with contact information for people to reach in case there are follow up questions or issues that need to be resolved.
Some important questions to ask when making a technical rider include:
- What types of displays does the output go to? What kind of connectors are used?
- What is the actual display resolution? Aspect ratio.
- Am I bringing the projector or displays? How does that get set up?
- Where am I setting up my table? Side stage or FOH or on stage. Is there enough power access there? Visibility to the stage?
- Is an audio feed needed? If so, where does it come from? What kind of cable is used?
- What camera feeds and other video inputs will be used during the show? How do they get from their sources to your computers?
- Do you need to get special content for each venue or event that isn't covered by pre-production? For example, logos or banners for festival.
- Is there safe storage space? Green room access?
- How much time is needed for setup and soundcheck?
- Who are the people involved and how can they be reached? Consider everyone you might need to contact: venue contacts, production assistants, runners, lighting designer (LD) and touring managers.
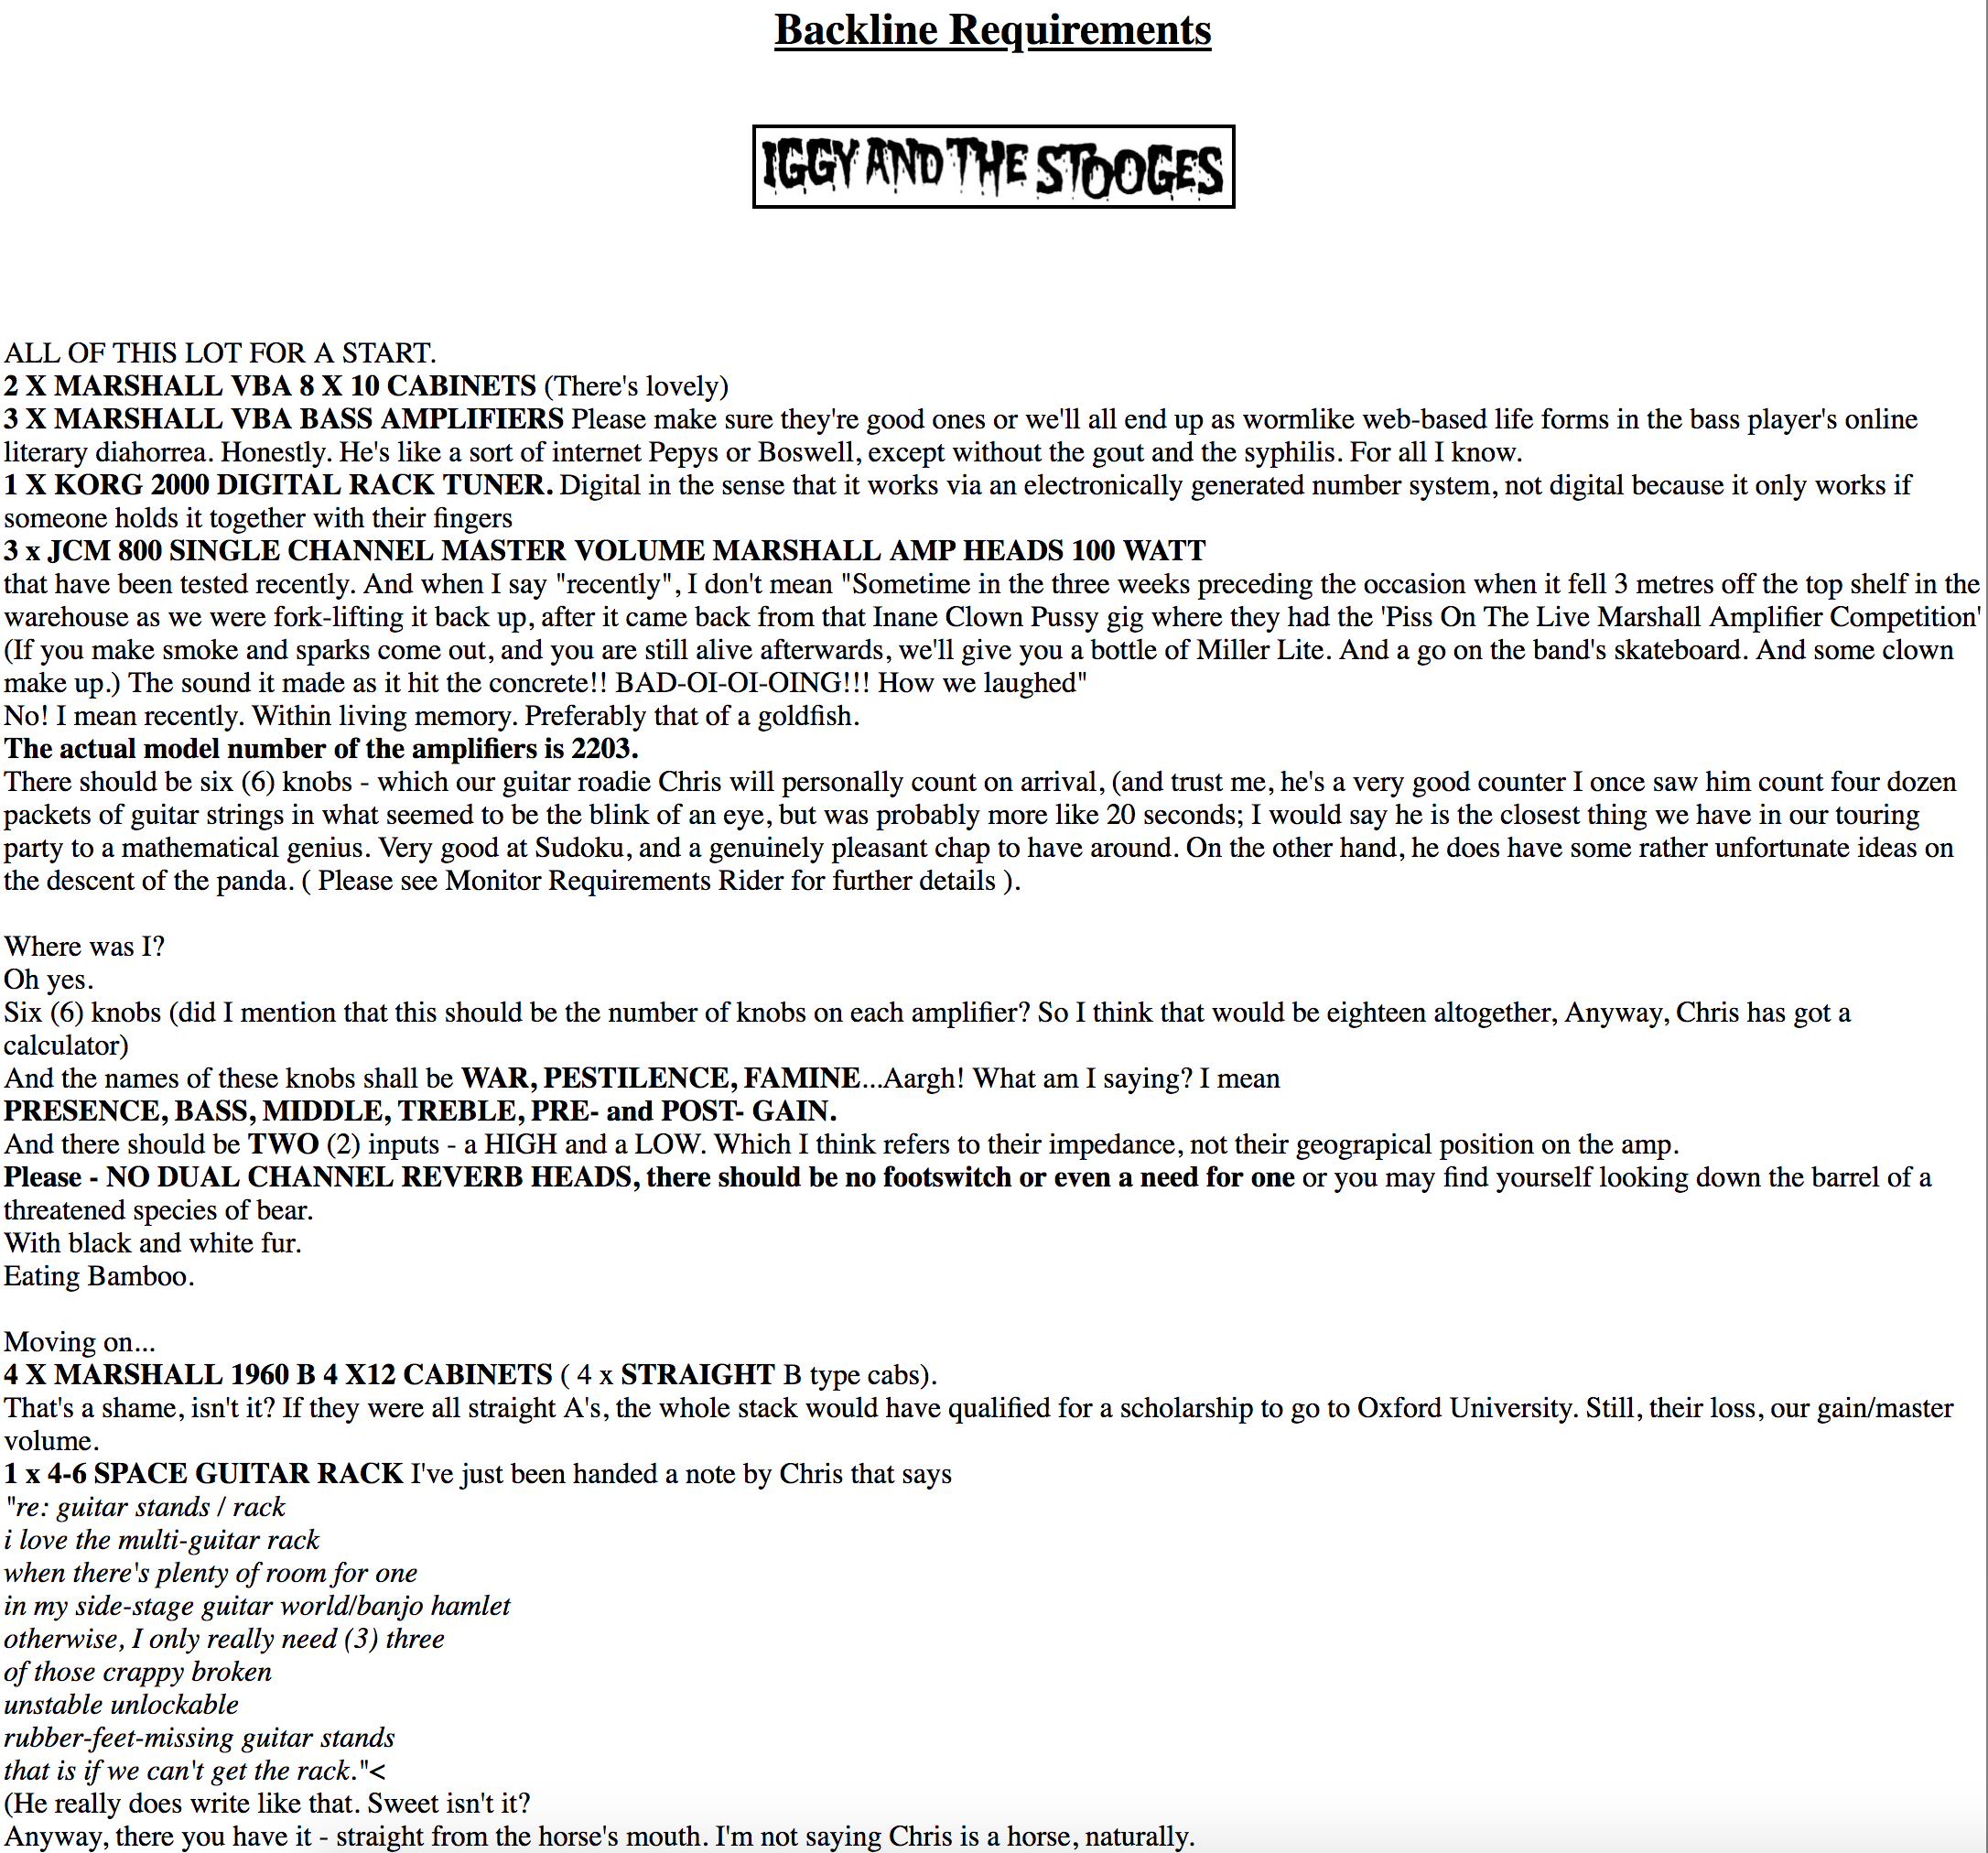
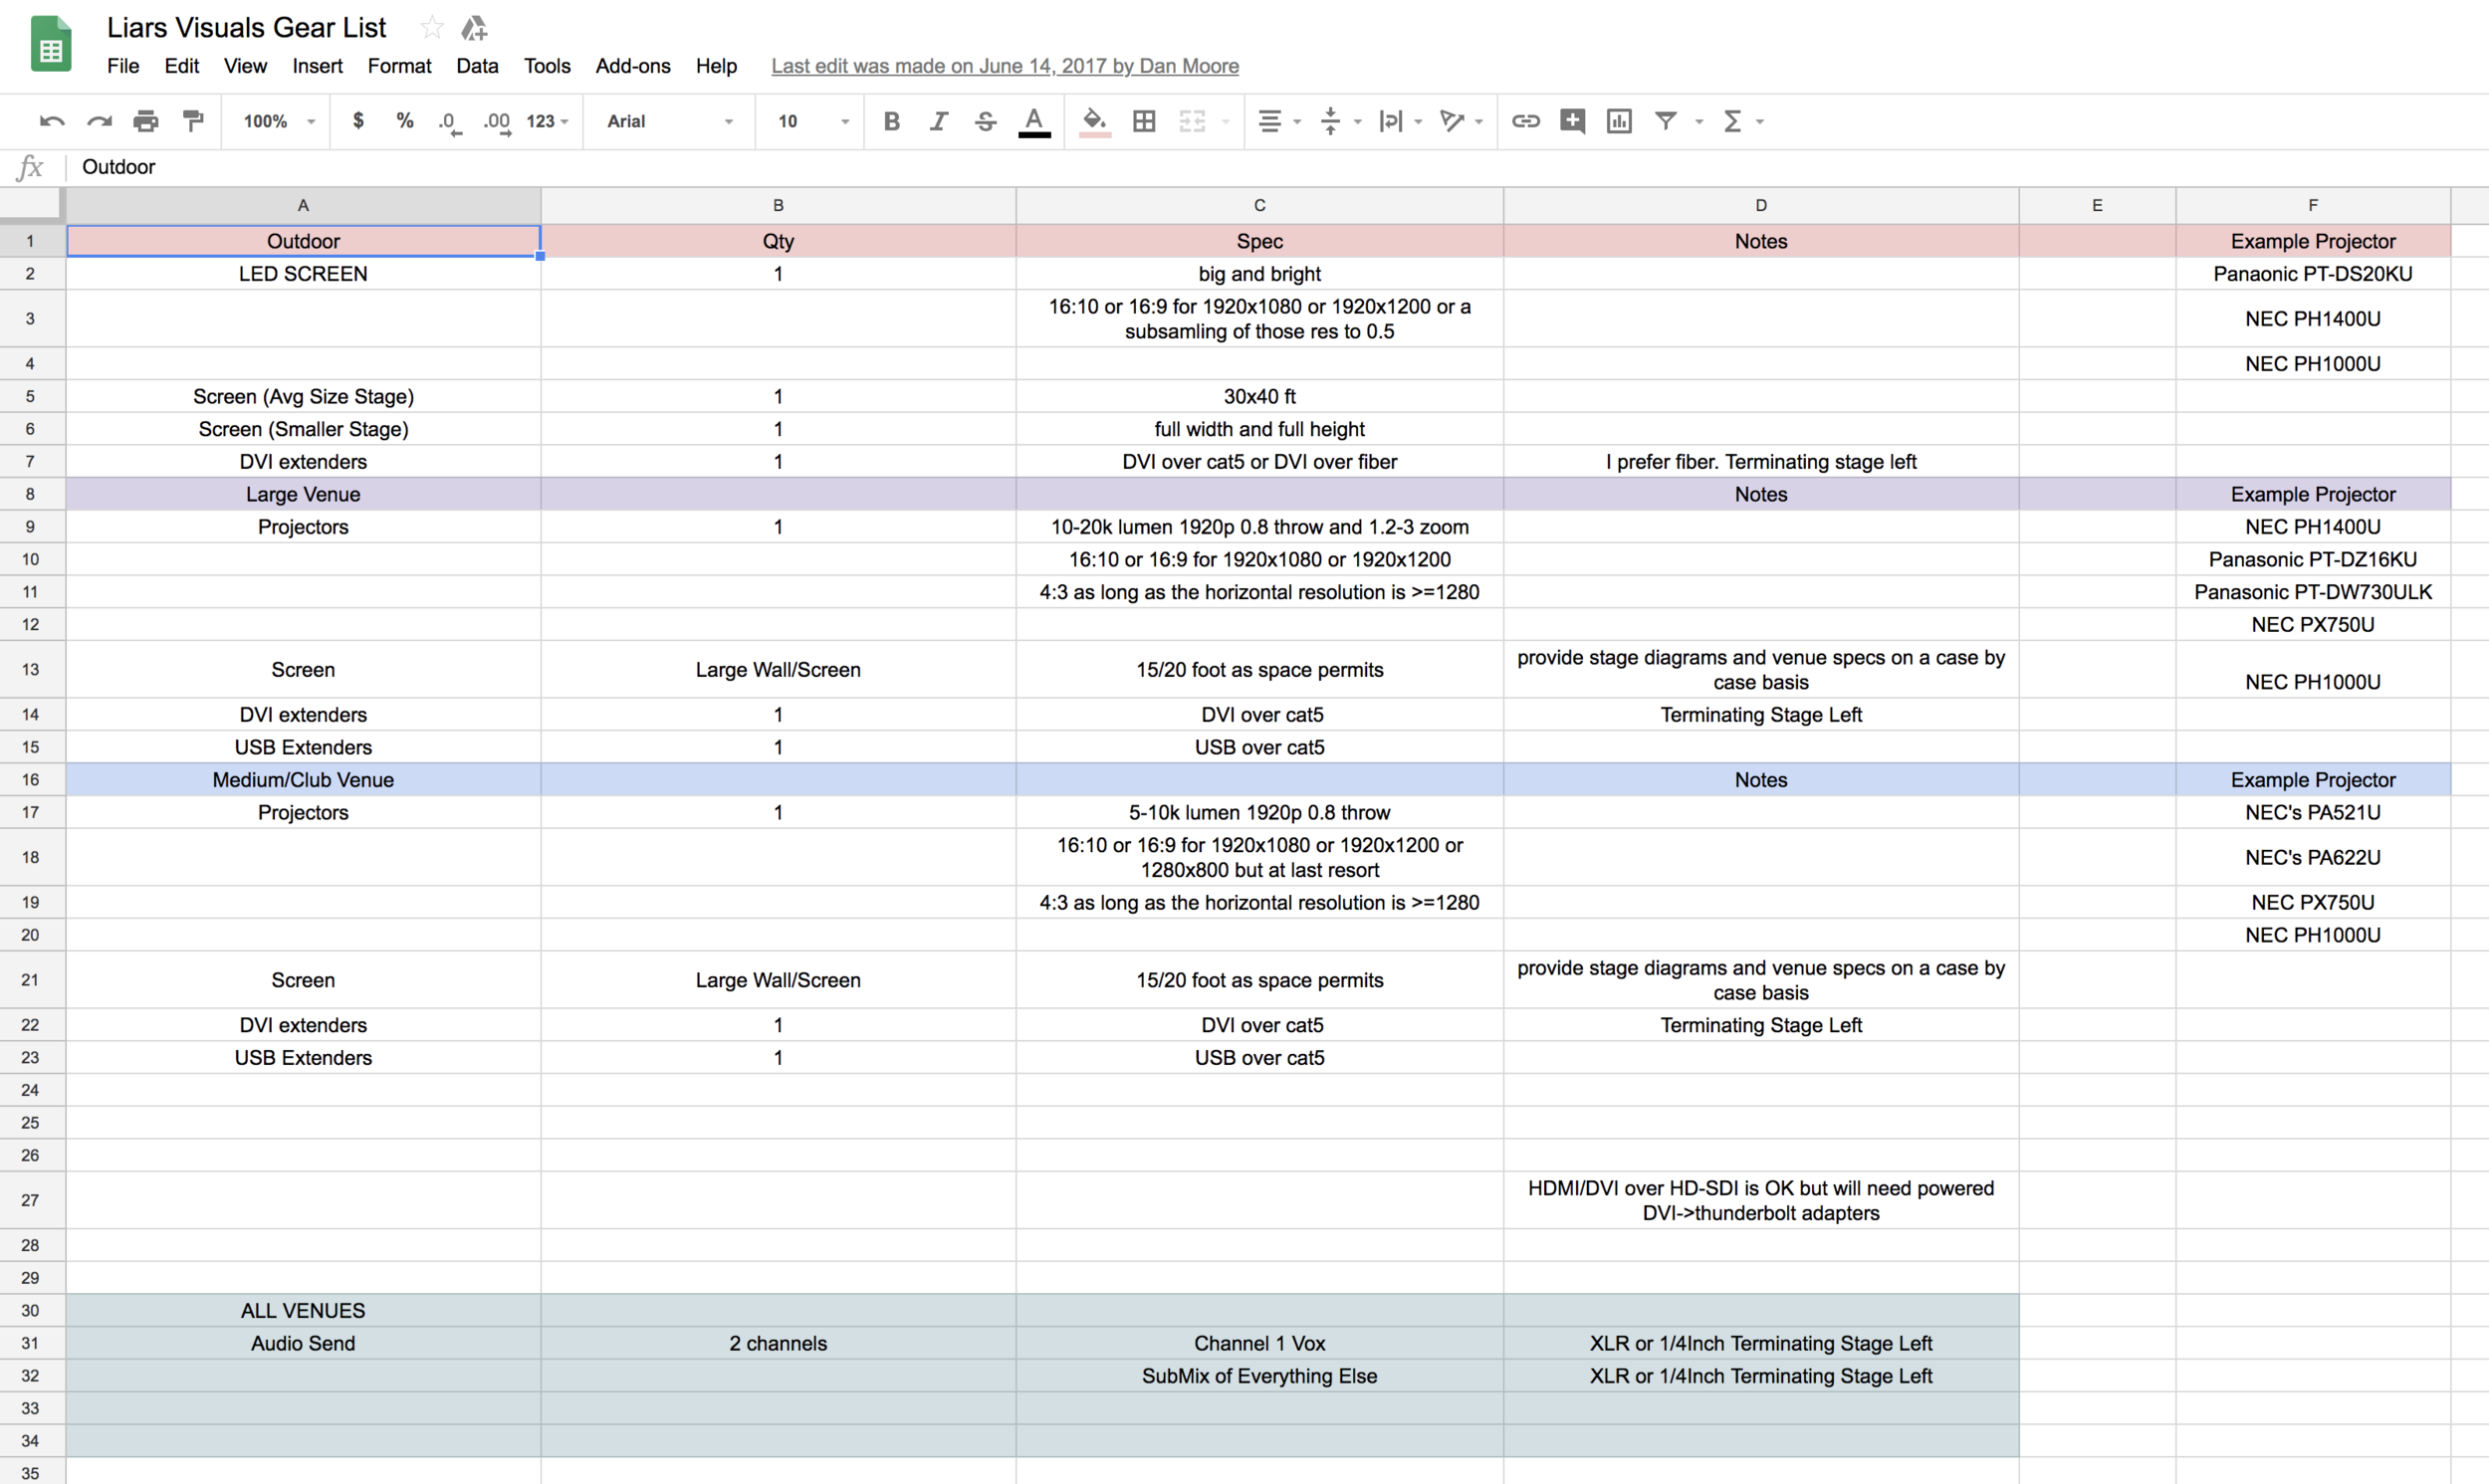
Like the other areas of this tutorial, there is no set process or template for making a technical rider; you can use a simple text editor, an image editing / layout app, spreadsheet software, or any other tool that you are comfortable with. In the gallery below you can find some example technical riders provided by various visual artists and other samples, such as the infamous Iggy Pop and the Stooges rider.


Beyond the items you include in the technical rider to share with other people, it can also be useful to prepare your own personal checklist of gear to pack and other useful information before the day of a big event or leaving to go on the road. Some standard items to consider are:
- A comprehensive list of all cables, adapters, computers and other equipment that belongs to you.
- A label maker for tagging your personal equipment.
- A toolkit that includes screwdrivers, extra screws, a measuring tape, flashlight, magnify glass, a work knife and anything else that might be needed to make quick repairs. A set of work gloves can also be useful.
- USB thumb drive for quick file handoffs.
- Backup hard drive with all your media files.
- Gaffers tape.
- Cable ties.
- Phone chargers.
- Extra batteries.
- A snack.
- A list of stores to nearest to the venue where replacement electronics, instruments or other equipment can be purchased.
And perhaps one of the most important details to remember is that even with the best advanced planning things will go wrong. In these situations we suggest taking a little advice from The Hitchhiker's Guide To The Galaxy – DON'T PANIC!
As these are just some samples of how mood boards, story boards, pre-planning notes and technical riders come together. Please share your own materials and experiences in the comments section below!